How to Master the Flat Bag Throw in Cornhole
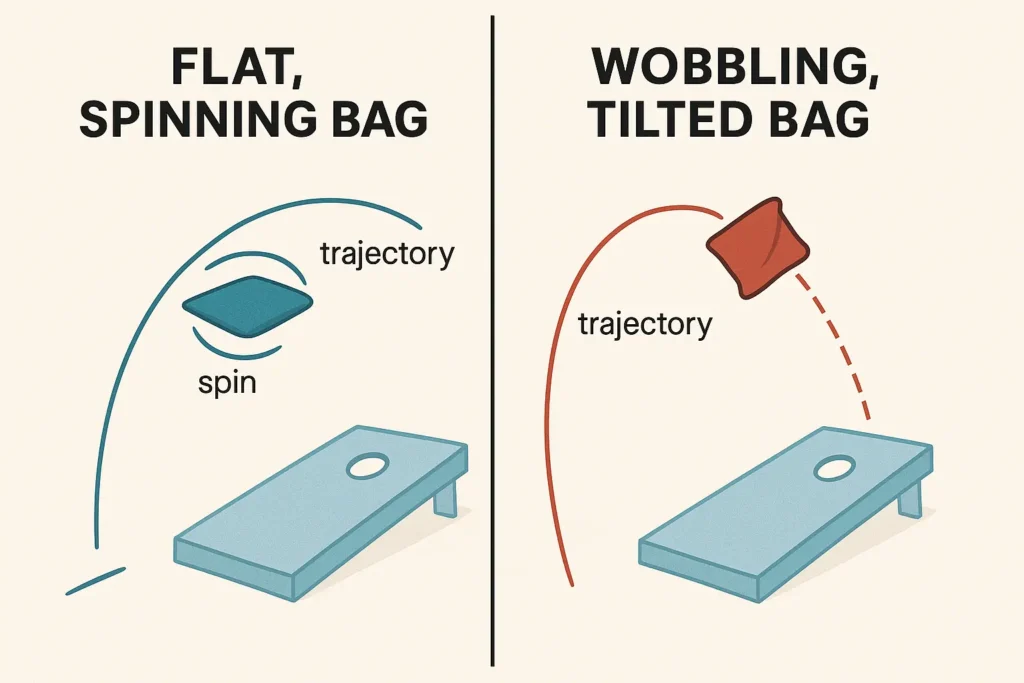
A flat bag throw is a fundamental cornhole technique in which the bag is released spinning horizontally (flat), much like a frisbee. By definition, a flat bag toss lands flat on the board, which “reduces unwanted slides or bounces”. This makes shot outcomes far more predictable: a spinning bag “sails” smoothly through the air and sticks on the board, whereas a non-spinning “flop” often bounces erratically.
Flat throws are crucial for consistency. Experts note that a true flat throw gives you “ultimate control” over where bags land. With this control, you can execute strategic plays like blocks (placing a bag to obstruct your opponent) or pushes (knocking opponents’ bags) more reliably, and it is the foundation for advanced shots (cut, flop, roll, etc.).
In short, mastering the flat throw is often called the first and most important lesson in cornhole, because it maximizes your scoring opportunities and consistency.
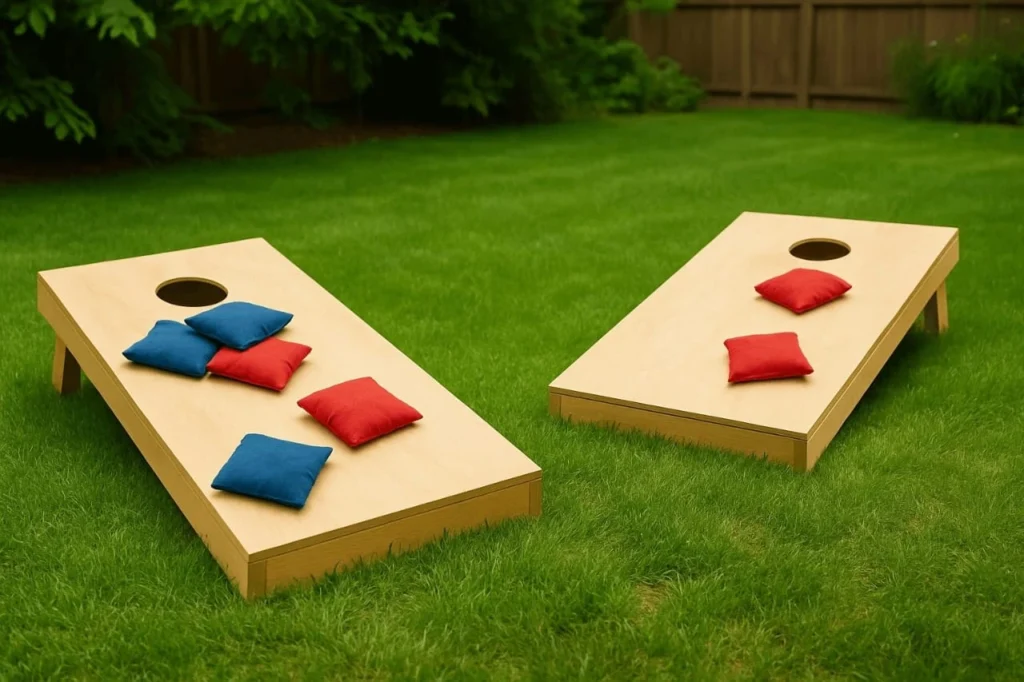
Cornhole is normally played with boards 27 feet apart, tossing 6″×6″ bags (about 1 lb) underhand. (Official rules require underhand pitches.) When you throw the bag flat, its aerodynamic stability improves. The bag’s spin creates a Magnus effect: air pressure differences around the spinning bag actually help keep it on course. In practice, a well-spun flat bag cuts through wind and lands softly on the board rather than bouncing off or sliding uncontrollably.
Flat Throw vs. Other Styles
Cornhole players use several distinct throwing styles. Each has its role, but the flat throw is often considered the “default” due to its versatility. Common styles include:
1. Slide Shot (Slider)
The bag is flipped so its slippery side (turboweave) is down, then thrown low onto the lower third of the board. It slides up into the hole for 3 points if executed perfectly.
- Pros: Slide shots tend to be very controllable and yield lots of three-point scores when the bag reliably slides in.
- Cons: They require enough force to slide all the way, and on rough or sticky boards a slider can stop short or bounce unpredictably.
A slide is essentially a fast flat throw that relies on friction to finish into the hole.
2. Airmail Shot
The bag is lobbed high and directly toward the hole, attempting to land in it without touching the board.
- Pros: Airmails can score 3 points and dramatically swing a game (especially if your opponent had blockers).
- Cons: They are very hard to land consistently, requiring precise release angle and timing. A mis-aimed airmail often overshoots or falls short with no points.
Most players reserve airmails for special situations.
3. Sling Shot (Arc Shot)
The thrower gives the bag a moderate upward arc (like a gentle lob). This underhand arc throw is comfortable and consistent for many players.
- Pros: It provides good control and a soft landing, making slides less likely. It is often called a “sling” because of the natural motion.
- Cons: Sling shots typically don’t score as many direct 3-pointers (unless turned into a slide), and the higher trajectory can be affected by wind.
4. Push/Bully Shot
A flat throw used to knock another bag.
- Pros: Strategically, it can remove your opponent’s bag or push their bags to worse positions.
- Cons: It requires extra force and precision. A slight error in angle or power can send your bag past the board or off wildly. (This is a variation of the flat throw with extra push.)
5. Flop (Blocker) Shot
A bag thrown with little or no spin, often with the “sticky” side down. The goal is to land and stay as a defender rather than slide in.
- Pros: A landing bag (worth 1 point) that blocks the hole can force opponents to make riskier shots.
- Cons: Flops are not used for scoring (they seldom go in the hole) and can be inconsistent if the release isn’t exactly horizontal (a half-spin flop can slide unpredictably).
6. Roll Shot
An edge-on throw where the bag rolls end-over-end across the board. This is an advanced, difficult shot used to flip a blocker out of the way.
- Pros: Can “roll over” an opponent’s bag block.
- Cons: Extremely hard to master. Usually one grips the bag on its side to force it to tumble on release. Not practical for most players beyond casual trick shots.
In comparison, the flat bag throw sits between these: it is underhanded and aims to land flat with spin.
- Unlike a slide, a flat throw is slightly higher so it lands rather than slides.
- Unlike a flop, it has spin so it grips the board instead of bouncing.
- Compared to an airmail, a flat bag stays lower and is more controllable.
Many pros therefore default to a consistent flat throw (sometimes with only a slight slide or push) and reserve exotic shots for special situations. In essence, the flat throw combines the control of a sling/slight slide with the stability of a spin, which is why coaches call it the “fundamental” or “professional” form.
Step-by-Step Flat Bag Throw Technique
Mastering the flat bag throw requires focus on each component of the toss. Below are the critical elements—Grip, Stance, Motion, Release, and Follow-Through—with pointers to achieve a true flat throw:
Grip and Bag Orientation
Hold the bag flat in your hand, not pinched in a corner. A common grip is with the thumb on top of the bag and fingers underneath, supporting it horizontally. Your grip should feel secure but relaxed. Make sure the bag stays level (not tilted) in your hand from start to release.
Many beginners mistakenly don’t tilt the wrist enough, so the bag exits angled rather than parallel to the ground. When preparing, point your palm (and forearm) upward; at release your palm/forearm should still be facing the sky. This ensures the bag leaves your hand in a horizontal plane.
Stance and Alignment
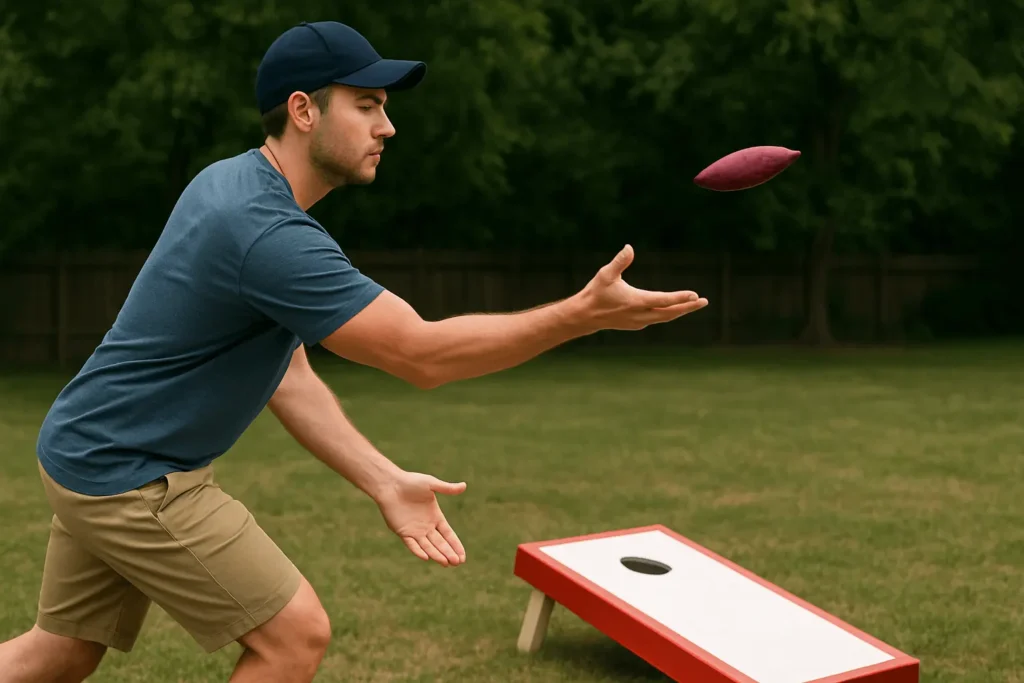
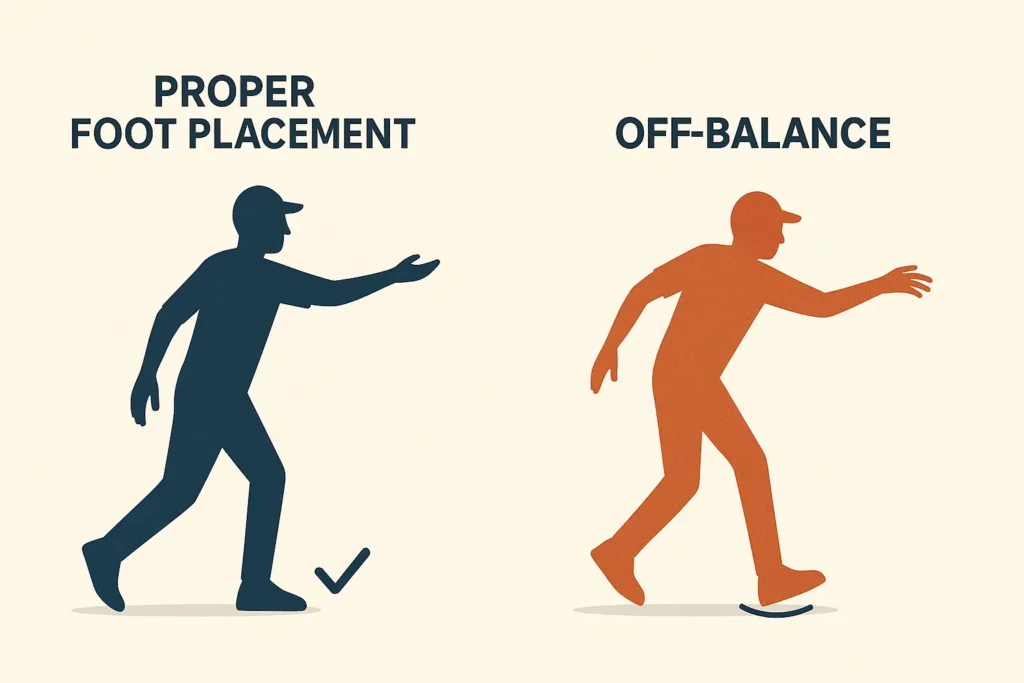
Figure: An example of a player throwing a flat, spinning bag underhand. Notice the player’s arm is extended forward, palms-up, with weight balanced—key aspects of the flat throw.
Stand with your feet about shoulder-width apart, giving you balance. If you throw right-handed, place your left foot slightly in front (against the side of the board, if comfortable). Keep your body square to the board and your weight evenly distributed on both legs.
Slightly bend your knees and lean your torso forward a bit – this stabilizes your lower body and helps control the throw. Your throwing arm should be aligned with the target: imagine a line from your shoulder through the bag to the board’s center (or hole).
Watch the target (board or hole) with your eyes as you throw, but keep your head steady. This alignment and balance are essential for a consistent toss.
Backswing and Forward Swing
Start the throw by smoothly swinging your arm backward. The motion is like a controlled bowling swing: use your shoulder and elbow to draw the bag back in a straight line. Keep this backswing slow and controlled. Many players err by snapping back the arm too fast, losing balance or rhythm.
The backswing should be gradual – think of it as loading up power. Then let your arm accelerate forward in one smooth motion. As you swing forward, keep the bag flat and palms up. Try to mimic a frisbee throw: as your arm comes forward, your wrist flicks through in the final degrees to impart rotation.
In other words, the motion is underhand until the last moment, then the wrist snaps to spin the bag flat. This wrist action is subtle but crucial: it spins the bag like a frisbee so that it stays level.
Release
Let go of the bag at the low point of your forward swing, approximately when your arm is slightly below waist level (as if you were swinging a pendulum). Release timing affects height and spin: too early and the bag may tilt upward; too late and it may point downward.
Aim to release when your fingers are pointing straight at the target. At release, your thumb will have come from the side (for right-handers, from pointing left to straight ahead), causing the bag to spin. A good cue is to imagine flicking your wrist as if you were throwing a small frisbee.
When done correctly, the palm/forearm will end facing the sky, and the bag will shoot forward flat and spinning. Practice watching the bag leave your hand: it should not spin off-axis (no flipping or curling).
Follow-Through
After release, continue extending your arm fully toward the target. Don’t stop your motion abruptly.
A full, smooth follow-through (like in golf or baseball) helps maintain the trajectory.
Keep your wrist relaxed – after the snap, let it extend naturally. A proper follow-through ensures you didn’t “pull up” early, which can slow the bag or make it wobble. Most pros end with their arm pointing at the board, fingers extended in the throwing direction. Consistent follow-through develops muscle memory, helping you repeat the same flat motion each time.
Putting it all together: when done right, the arm swings in a natural pendulum, the wrist snaps at release, and the bag rotates like a frisbee. The result is a flat-spinning bag that flies straight. In fact, one guide summarizes the motion neatly: “arm motion will be similar to bowling… wrist motion is like that of throwing a frisbee”.
Mastering each step—grip, stance, motion, release, follow-through—through slow, deliberate practice is how you’ll consistently hit that “perfect flat” throw.
Biomechanics and Physics
Understanding some underlying mechanics can help refine your throw. When you deliver a flat bag, your arm behaves like a pendulum: the shoulder is the pivot, and the forearm swings down and up.
A fluid, pendulum-like motion produces the most consistent outcome. This means keeping your shoulder level, letting the elbow and forearm swing freely, and not forcing extra movement.
As one physics explanation notes, “a player’s arm acts as a pendulum during the throwing motion… Mastering a consistent, fluid pendulum motion can lead to more accurate and consistent throws”. Try to feel that rhythm: if your arm is jumping or glitching, the pendulum effect is lost.

Figure: A Newton’s cradle pendulum. A smooth pendulum swing (left-right) of your arm promotes consistency. Likewise, the bag’s spin creates air pressure differences (Magnus effect) that stabilize its flight.
Spinning the bag invokes the Magnus effect: a spinning bag experiences pressure differences that tend to keep it on course. In simpler terms, the rotation stabilizes the bag. A well-spun bag is “less susceptible to external factors like wind,” maintaining a straighter flight.
That’s why you’ll see pros explicitly focus on giving the bag even rotation. The more consistent the rotation (and the more spins per distance), the more the bag resists side winds and odd bounces.
Finally, consider the trajectory: a flat bag should travel in a gentle parabolic arc. A common tip is to aim for the “ideal arc”: the angle that lets the bag land softly on the board, maximizing the chance it stays (or slides cleanly) rather than bouncing off. If you throw too flat (shallow), the bag might slam and bounce off. If you throw too high, it may loop awkwardly.
Tuning your launch angle and force is key. Generally, moderate force is needed—just enough to reach the board and hole—but not so much that the bag flies too flat and bounces off.
In practice, pay attention to where your bag hits: aim for it to descend and touch down gently. One helpful approach is to adjust your release angle slightly in practice and note how the landing changes.
In short, think “smooth pendulum + steady spin + soft arc.” Keep your motions relaxed and repeatable so that you hit the same release point each time. As one trainer notes, both the release point and the force you apply are critical for accuracy.
By refining each mechanical element (shoulder pivot, wrist snap, release angle), you align the physics in your favor: a spinning, flat bag following a controlled path onto the board.
Practice Drills and Routines
To lock in the flat toss, use focused drills that isolate elements of your throw. Here are some effective routines and tips:
Target Practice Drill
Mark specific points on the board (e.g. tape or chalk). Try to hit those targets repeatedly from your throwing position. This forces you to focus on aim and release consistency. For example, aim at the center of the board, then at the left or right side. Hitting tiny targets builds precision and helps you feel how slight changes in angle affect the shot.
Distance Variation Drill
Start closer than regulation (e.g. 10–15 feet) and throw a series of flat bags, then move back incrementally toward 27 feet. At shorter distances you can focus on form without worrying about power. As you step back, maintain the same smooth motion. This drill builds consistency and helps you adjust power naturally.
Consistency (Repetition) Drill
Practice making 50–100 flat throws focusing on the same exact motion every time. Do not worry about scoring; instead, concentrate on replicating grip, swing, and release each throw. This muscle-memory drill ingrains the form into your body, so it becomes automatic. Record how many consecutive good flat throws you can do—set targets (e.g. 20 in a row) to challenge yourself.
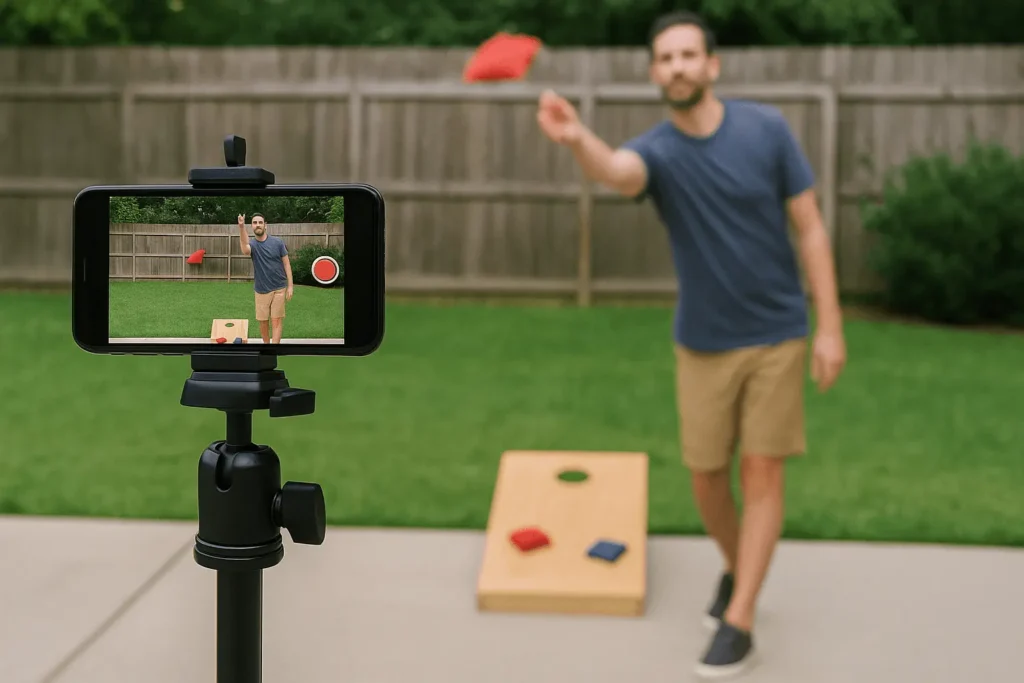
Video Analysis
Record your throws on video (even phone camera). Reviewing footage helps identify subtle mistakes in form. You might spot if your wrist comes down too early, if your arm swings off line, or if your follow-through is incomplete. Many players find self-analysis or coach feedback invaluable for correcting flaws.
Drills with Scoring
To make practice game-like, impose points for your throws. For example, award 3 points for a bag landing in the hole, 1 point for on-board, 0 for misses, and see if you can “beat” a score threshold. Friendly competition or gamification adds focus under pressure.
Warm-Up Routine
Always warm up with a few relaxed throws. This might include some stretches or a handful of spin-only flicks to loosen the arm. A proper warm-up (even a few underhand rolls) reduces tension and increases fluidity.
Feedback Loop
Practice with a partner or coach who can call out inconsistencies. For instance, you might discover you open your fingers too soon, or that your stance drifts. Continual feedback helps you self-correct on the fly.
Environmental Adjustments
Practice in varied conditions. If you can, play outdoors on windy days and learn to compensate (e.g. aim slightly upwind). Also practice on different boards (older, newer, different surfaces) so you adapt quickly in real games.
By working through these drills regularly, you’ll develop and maintain a reliable flat toss. A structured routine—consistent practice sessions, goals (e.g. hitting a certain target %, or making 50 consecutive boards), and reflection—is key to mastery.
Common Mistakes and Corrections
Even after learning the basics, players often make repeatable errors. Awareness of these pitfalls (and how to fix them) will speed up your progress:
Not Enough Spin (Flipping/Flopping Bag)
A frequent issue is gripping or releasing so that the bag doesn’t spin properly. If the wrist doesn’t snap or the fingers let go too early/late, the bag may tilt and essentially flop rather than roll. The fix is to focus on the frisbee-like wrist flick and a level palm at release.
Check your grip: ensure your fingers are under the bag until the last moment, and that the thumb drives the spin. Practice slowly watching the bag leave your hand; if it’s wobbling, adjust your wrist follow-through until it spins flat.
Tilted Bag
Related to spin issues, beginners sometimes release with the bag angled up or down. An upward-tilted bag flies high and may tumble; a downward angle makes it hit edge-first. To correct this, consciously keep the bag parallel to the ground at release. Drilling in front of a mirror can help you see your hand’s angle.
Remember the rule: palm up and bag flat.
Rushing the Throw
Many players speed up mid-swing, especially transitioning from backswing to forward swing. This jerky motion leads to inconsistent releases or a snapped, off-balance throw.
Correction: slow things down.
Make your backswing deliberate and your forward swing gradually accelerate. A smooth, even tempo ensures you stay balanced and time the release right.
Poor Stance/Balance
Your stance can sabotage your flat throw. Examples include leaning too far back (throwing up), leaning forward (getting too low), or stepping out of turn (foot fault). Always keep weight balanced (as taught above) and don’t step over the foul line. Even small shifts in stance can send the bag off target.
A stable base is foundational: rehearse throwing with emphasis on posture, using props if needed (e.g. one foot along a board edge).
Overpowering the Throw
Beginners often think more force = better. In reality, throwing the bag too hard can cause it to slide off or bounce. As one tips page warns, throwing with “too much force or an inconsistent grip” is a common error.
Focus on control: many pros score best with a calm, measured throw rather than brute strength. Fine-tune the loft and spin instead of simply throwing harder.
Inconsistent Follow-Through
Some players stop their arm immediately after release, which alters the bag’s path. Always complete your arm motion toward the target. If you habitually pull up early, experiment with an exaggerated finish and see if your toss stays truer.
Hand Position Errors
Double-check basic things: Are you unintentionally cupping the bag in one corner? Are your fingers sliding off on release? Even subtle hand position changes between throws can cause wild results.
If your shots keep going left/right, it might be your grip consistency. Reset by consciously gripping the same way each time.
Avoiding these mistakes comes from disciplined practice and self-awareness (or coaching). Video feedback can reveal flaws you don’t feel.
For example, you might think you keep your wrist flat, but slow-motion video could show it dipping. Work on one error at a time: fix your grip first, then stance, then swing pace, etc. Over time, corrections become habits, and your flat toss will become second nature.
Tips from Pros and Coaches
Finally, consider these pro-level tips to elevate your flat toss:
- Underhand Only: Remember that competitive play mandates underhand throws. Even if an overhand might occasionally arc better, stick to practicing the standard legal style. Pros unanimously agree that underhand provides far greater control and consistency.
- Consistent Release Point: Top players emphasize releasing every bag at the same spot in your swing. Mark a point (e.g. eye or chest level) where you let go, and aim to do it identically each time. This consistency underpins repeatable flat throws.
- Thumb Up, Palm Up: A universal grip cue is “thumb on top, palm towards sky”. Keeping that orientation from start through release ensures the bag is flat. Some players even imagine tilting the board in front of them and keeping the bag flat against it in flight.
- Eye on the Target (But Hands Execute): Maintain focus on where you want the bag to land, yet trust your practiced motion. Don’t watch your hand; watch the board. This frees your body to move naturally. Visualizing the trajectory can help—some pros look at where the bag should land, not necessarily straight at the hole (e.g. bottom board for a slide).
- Smooth Tempo: Many coaches say the flat toss should feel relaxed. Try counting in your head (“one… two and throw”) to regulate tempo. Avoid jerky starts/stops. A consistent rhythm (like a metronome) trains your muscles to repeat the same motion.
- Footwork Variations: Some pros step on the opposite foot or stay planted. Experiment to see what’s best: common choices are a slight step forward with the non-throwing foot, or no step at all. The key is that your final foot position shouldn’t shift at the release point (which would throw off aim).
- Use Quality Gear: Especially when learning, use quality, ACL-approved bags and regulation boards. Cheap or uneven equipment can mask your skills. Professionals recommend certified bags, as their consistent weight and fill enhance predictability.
- Practice Routine: Develop a pre-game routine (like warm-up throws) to get “dialed in.” Pro players often have set rituals for the first 3–4 throws to ensure feel and focus. Being mentally prepared (confidence, calm breathing) is as important as physical technique.
- Patience and Incremental Goals: Improvement takes time. Set small, measurable goals (e.g. “10 in a row flat on board”) and build from there. Celebrate consistency first, then accuracy. Keep practicing even when tired—muscle memory is built through repetition.
By integrating these expert hints into your practice, you’ll accelerate your mastery of the flat toss. Remember that even top players continually refine their basic form. As one pro guide notes, “the secret to the perfect cornhole technique is practice, practice, and practice”.
Use drills and feedback to lock in each element, and over time your flat throw will become a reliable weapon in your cornhole arsenal.
Further Resources
- Video Tutorial: “Throw a Flat Bag Like a PRO 2024” – ACL pro Eric Tscherne demonstrates the flat throw technique step-by-step.
- Video Tutorial: “The SECRET to Throwing a FLAT and ACCURATE Bag” – Another coaching session with Eric Tscherne & Jodi Lim.
- Official ACA Rules: American Cornhole Association’s rulebook (covers board distance, underhand rule, scoring).
By studying these resources and applying the guidance above, beginners can build a solid foundation and advanced players can fine-tune their form. With deliberate practice of the flat bag throw, your cornhole game will become far more consistent and competitive.
Good luck, keep practicing, and may your bags stay flat on the board!